Tuesday 21 December 2021

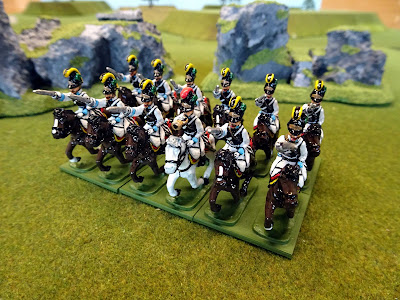
5th Cuirassier Regt. Sommariva

These chaps were rushed into action with their paint barely dry at the Third Battle of the Hut, so I never got around to introducing them formally to you. If their performance in that game is anything to go by, they will have a glorious career ahead of them.

All the figures are the one-piece casting AN.73 Cuirassier (mounted) charging with one converted to a trumpeter.

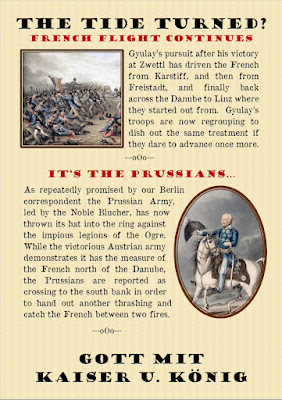
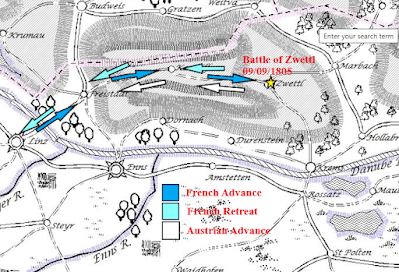
My Campaign with Rob has been rumbling on, but I haven’t been able to post on it here as the need for secrecy (and reputational preservation) has been paramount.

When viewing this map you need to be humming along to the Dad's Army theme tune. This was not the finest hour of the French army but I console myself by thinking it was just a side-show for the main event still to come nearer to Vienna.
I can hardly blame Rob for taking advantage of such a propaganda coup.

Things are coming to a head now and I suspect that a decisive battle will be coming along soon.

Thursday 16 December 2021

More Pavlovian response

Thanks to all who responded to the last post and particularly to Matthew and Goya for their efforts to seek out information on the mysterious ‘greatcoat’ stowed on top of the pack. The first thing to mention is that I was wrong when I said that it only appeared on the marching figure because Matthew sent me the photo below showing the same item on vintage castings of the charging and firing figures.

All three figures are modelled with a rolled item above the pack that has three buttons at the top either side of a central securing strap.

This means that, whatever it is, Marcus Hinton intended to sculpt it and must have had a reference source that showed it. This is one instance where the Hinton Hunt painting instruction sheet would be very helpful but sadly, I don’t have one. Matthew, Goya and I have trawled the internet for images that might reveal the nature of the mystery item but to no avail although Goya did find this one below.

This looks promising except that the illustration shows the 1817 regulations and is also of a line infantryman not a Pavlovski Grenadier.

Goya also found this bit of text which may explain what the roll was:

For the cover for the coat and leggings. — The coat must be rolled and wrapped in the leggings [kragi] so that it is as long as the knapsack and its diameter is 6 inches in thickness. It is placed into a round oilcloth cover made to these dimensions with an opening at one end that is closed with a drawstring. This case is to be carried on the knapsack with the opening to the left side and in the middle tied by the greatcoat strap to the strap that holds the canteen.

However, the item modelled on the figures very definitely has six buttons on the top and doesn’t look as if it is supposed to represent a drawstring bag so back to the drawing board.

While repainting the roll I also took the opportunity to tidy up the back of the mitre cap.

In the end I have decided to paint the roll as a canvas/brown bag which is good enough for my purposes but if anyone does have a copy of the Hinton Hunt painting instructions I’d be interested to see them.

********* EDIT *********

Eagle-eyed Rob spotted the picture below.

Although this isn't a Pavlov the mystery roll does have buttons just like the figure - still not sure what it is but problem solved.

So it looks like I will be repainting them black!

********* FINAL EDIT *********

Thanks to ongoing work by Goya and Rob we appear to finally have the answer regarding the mystery item. I'm 99% sure that it is the leather gaiters that are strapped to the top of the pack and that the figure has been modelled in 'summer' trousers.

Painted for the third and final time, Pavlovski's in their summer best.

A close examination of a line Grenadier casting next to a Pavlovski castings has confirmed this as the line figure is wearing his gaiters with buttons to the knee, whilst the Pavlovski has buttons halfway up the calf which would fit with the summer trousers theory. So that's it, the figures have been repainted accordingly now it's time to move on.
Friday 10 December 2021

Pavlovian response

Like many wargamers of a certain age the Pavlovski Grenadiers are right up there in my affection with the 95th Rifles and the Grumblers of the Old Guard so it’s no surprise that I have felt the urge to paint some at last, although I must add that I have been careful not to drool on them in the process.

RN/7 Pavlovski Guard, marching.

I’ve had these figures in the lead pile for well over 10 years but I’m not entirely sure of their provenance. The castings seem too light and crisp to be vintage ones but too well defined to be Clayton’s, I can only assume they are recasts but if they are, they are very good ones.

I've painted the rolled up greatcoat on top of the pack black in an effort to disguise it.

One curiosity is that the marching figure not only has a greatcoat rolled around his body but also one rolled above his pack. This is an odd mistake for Marcus Hinton to have made but I do have a few Clayton’s as well, and they have the same error. It’s just the marching figure which is like this as I have samples of the other positions and they don’t have the second greatcoat.

If any of you have bona fide (should that be bona fido?) vintage castings of same, then please let me know how many greatcoats they have by leaving a comment – perhaps they have been issued with two because they are Guard?

Wednesday 1 December 2021

The Battle of Zwettl – The Game

I have to confess that I was pretty confident going into this game that the French would be able to hold off the Allies whilst gaining at least one of the VP locations. In hindsight I’m not quite sure why I thought this when I had neither cavalry or skirmishers in my force and only one artillery battery. As you will have guessed it didn’t go well for the French!

The French get off to a good start with four infantry columns pushing forward towards the VP locations.
Likewise, the Allies are making a general advance.

As Poniatowski's troops crest the central hill they start to come under fire from the Austrian artillery and a group of rifle-armed Jagers on their flank.

Eugene's lads are nearly at the VP location to their front but the unit of Brunswick Hussars on the hill opposite are well placed to make a charge against them.

The Brunswickers draw sabres while their escorting Foot Battery prepares to unlimber.

In the centre of the field the 51st Gabriel Spleny Regiment is advancing in line supported by the Toskana Dragoons.

I chose to keep the Nassau Grenadiers in reserve to protect my lone battery but perhaps this wasn't such a smart move as it left the flank of the 8th Poles exposed.

Eugene had no choice but to order his two Battalions into square and the Brunswick artillery immediately took advantage of such a lovely dense target.

The 8th Poles were taking increasingly heavy casualties including losing their Colonel, so Poniatowski was obliged to step in personally to shore up a rather rocky morale throw.

The Jagers continued to pop away unhindered as I had no skirmishers of my own to counter them. The supporting Austrian Hussars were snuggly out of line-of-sight of my battery.

This is how things looked after 4 turns. The 8th Poles (outlined in yellow) are now disordered.

The centre viewed from the Allied side. The Brunswick Leib-Battalion is pouring fire into Eugene's squares while the Spleny's exchange volleys with the 4th Swiss.

Unsupported, and with their Colonel down, Poniatowski tries to steady the wavering Swiss with unfortunate consequences. On the plus side there will be no swimming in the Elster for him.

The Swiss and the Spleny's slog it out with some sharp musketry.

Eugene's squares are snookered - they cannot advance because of the Brunswick Hussars but their dense formation is causing casualties to mount up and morale to become shaky.

The Swiss have had enough and head for the rear - who can blame them?

Seeing that the Combined Voltigeurs have become disordered the Brunswick Hussars seize the moment and charge with predictable results.

The Austrian Hussars move up to take the second VP location.

The situation at the end of play (Turn 8). The total game VP's were 16 to zero in favour of the Allies - some might call that a crushing defeat for the French!

Eugene ponders his future in the Grande Armee.

Of course the Austrian Press couldn't resist putting out this special edition. I must say that the chocolate does sound quite yummy.

Under the Campaign Rules Eugene must now retire back to the town he came from (Karstiff) and Poniatowski’s old Division must go with him although it will not be able to take part in any offensive action until a new leader arrives from HQ to take command.

Rob gets a total of 6 Campaign VP’s (5VP’s for winning the battle and 1VP for destroying my Combined Grenadier unit).

Friday 26 November 2021

The Battle of Zwettl – Scenario

We have our first action of the campaign in the hills north of the Danube near the town of Zwettl. An Austro-Brunswick force has stumbled into the column of Prince Poniatowski and Eugene as they advance eastwards. In panic, General Gyulay and the Duke of Brunswick throw together an ill-conceived plan to attack the French rather than withdraw or surrender.

More fake news cranked out by the Vienna Ministry of Information.
As we are using concealed movement I'm afraid this map of the general area can tell you very little other than some of my forces north of the Danube are marching east. If you want to know more of the 'big picture' from the French side you can always email me (I can forward similar requests regarding the Allies to Rob).


French OOB

Poniatowski
4th Swiss B
8th Poles B
Nassau Grenadiers B
1 x Foot Battery

Eugene
Converged Voltigeurs A
9th Legere A

Allied OOB

Duke of Brunswick
Leib-Battalion B
Brunswick Hussars B
1 x Foot Battery

Gyulay
51st Gabriel Spleny B
Toscana Dragoons A
Combined Hussars B
1 x Foot Battery
6 x Jagers

The initial deployment of both armies. As you can see this is very hilly terrain with lots of blocked line-of-sight.
The view from the French side of the table showing the situation at the start of play.

This will be an interesting fight with such an imbalance of infantry and cavalry between the two forces. The French have a slight edge being closer to the VP locations than the Allies, but this will be offset by the superior mobility of the Austro-Brunswick force.

Sunday 21 November 2021

Third Battle of the Hut

This week Tony, Nigel and I assembled once again in the Hinton Hut to play a game of Muskets & Marshals. It was another attack and defence game with me commanding a French army that was slightly smaller than the combined attacking Austro-Russian and Prussian armies. In total there were just over 800 Hinton Hunt figures on the table, all from my own collection.

This is how the action went.

The initial dispositions of the armies - amazing how 800 figures can look so sparse on a 6' x 4' table. French on the left, Austro-Russians nearest the camera and the Prussians just beyond them on the allied right.
Nigel commanded the Austro-Russian force. For this game they were joined by the Nassau Grenadiers (left in the front rank).

This village was one of the VP locations and was garrisoned by the French 24th line infantry. In the game VP locations were worth 5pts to the Allies but nothing to the French.

The Imperial Guard. Having a force like this is always a great comfort in a wargame, what could possibly go wrong if you have these lads on your side?

The Prussian infantry were under Tony's command. They looked quite intimidating en-masse.

Pretty in white! The Sommariva Cuirassiers (front) were rushed to the table with the paint on their bases barely dry to join their friends the Toskana Dragoons.

Turn 1 and I made the bold decision to develop an attack against the Allied centre beginning by moving up my heavy cavalry. In the top left of this photo you can see that Tony is advancing his light cavalry in an attempt to flank me on the left.

On the opposite flank things soon got nasty as the Pavlograd Hussars mixed it with the 6th Chasseurs.

For this game the Tyrolean Jagers were fighting as a close order formation which made a bit of a change. In the background you can see that Nigel is sending his Cuirassiers over to reinforce his left flank.

Another 'how it would have looked in 1972' photo.

Things didn't go quite as I hoped. The Carabiniers fell foul of a deadly cannister blast that saw them removed from play.

Meanwhile on the left, Napoleon sent La Bedoyere forward to help steady the wavering 85th line who seemed to be facing off against the entire Prussian army on their own.

My Cuirassiers did manage to rout the Silesian Musketeers however, and to force the Prussian Fusiliers into square.

1972 again.

Time to push forward in the centre-right. The Swiss and the Poles lead the advance with support from the Empress' Dragoons and the Young Guard.

Having conducted a masterly flanking manoeuvre, Tony threw the Silesian Hussars at the Guard Horse Grenadiers. This didn't end well for the Prussian hussars and both they and the supporting Uhlans were soon sent packing.

Drama in the centre as the Prussian Cuirassiers ploughed into the 45th line carrying away their eagle (why is it always the 45th?). Behind them the Prussian Dragoons have presented a rather nice target to my Guard foot artillery.

My own Cuirassiers have finally met with some stiff resistance and run away.

But the Empress' Dragoons come up just as the 4th Swiss also turn and melt away.

On the other half of the field Nigel suddenly remembers that he has infantry as well as cavalry and the columns start to tramp forward. The Moscow Grenadiers have just been routed by the 8th Poles although the Poles are now a bit isolated from their supports.

The 45th line make an undignified exit towards the rear whist the 1st Guard Grenadiers form line ready to blast away the pursuing Prussian Cuirassiers.

Vive le emperor! The Young Guard and the Guard Marins continue to advance.
Nigel's Cuirassiers finish off the 6th Chasseurs breaking the curse of the 'new boys' in their first battle.

Tony's infantry are closing in on my left-flank VP location (on the hill). I was intrigued to see how Tony did not have the same confidence in the Landwehr that Nigel had in our last game. Safely tucked away in the back line, they were the only units in his force not to suffer a single casualty in the battle.

The Prussian Musketeers press forward and poor old Gneisenau goes down.

The boys from Brandenburg crest the ridge forcing the the 85th line back to claim the VP location.

Er, um, I sort of wish that I hadn't ordered this charge by the Empress' Dragoons. I'm sure she would have been proud of them though.

The Old Guard move forward but it's now turn 7 and just a bit late to turn the tide - they look pretty though.

Even Nigel's tardy infantry have found a new lease of life as they charge into the village.

The Guard Marins melee with the Moscow Infantry but they have no supports and most of the Austrian units are still untouched.

The 24th line are expelled from the village and are cruelly ridden down by the Pavlograd Hussars.

To top it all, the new boys slam into the rear of the just rallied Swiss. Turn 8, victory is sealed - 33 points to 11 in favour of the Allies.

The run of bad luck for the emperor continues – I really should paint up some more French infantry.

Another highly enjoyable game and my thanks go to my visiting generals for their company and for soundly beating me yet again!