Sunday 30 October 2016

Vintage Leipzig (Part 1)

We finally got the chance to play Vintage Leipzig yesterday and it turned out to be every bit as good as the Waterloo game we played last year. Roy did an amazing job of organising and hosting the event not to mention the fact that he knocked up an entire 14 unit Austrian army in the space of 6 months just for this game!

We had eight players which worked out exactly right for the number of commands available and we managed to play eleven turns taking events to a satisfying conclusion. The rules as always were my own set ‘Muskets & Marshals’ and there were well in excess of 2,700 Hinton Hunt figures spread over the two tables.

To make more sense of the following photos and narrative you may want to take a look at my Planning Vintage Leipzig post before you read on.

At the pre-game briefing we divided up the commands and I ended up with Marmont's corps. This was a tricky role as my force of 10 battalions was oposed by some 17 battalions of the enemy. This is the north table showing the initial deployment of my corps.
This is the centre of the French line on the south table between the villages of Markkleeberg (on the left) and  Connewitz (on the right). Roy had a cunning plan to denote the built up areas with A4 sized sheets of MDF. Under my rules only one unit at a time can occupy a BUA.
This is the view across both tables from the extreme right flank of the allies on the south table. In the foreground (stretching to the wood) is Benningsen's Russian corps. On the far side of the room is the north table.
The other half of the allied line on the south table. These are Schwarzenburg's Austrians some 16 battalions strong supported by 6 cavalry regiments and numerous artillery batteries.
These are the Russian cavalry regiments and artillery on the flank of Benningsen's line. As always Roy has a limber for every one of his guns - not many wargamers can boast that.
And these are the Austrian cavalry on Schwarzenburg's flank - the Hinton Hunt Austrian hussar has to be one of the best figures Marcus ever produced and they look simply stunning en-masse. Nice limber too.
Back to the north table - this is Blucher's Army of Silesia. My recently completed cuirassiers are tucked away in the back row behind another unit of cuirassiers that Roy managed to magic up from somewhere.
Part of Augereau's command in the centre of the south table. You may recongnise my Swiss and next to them the 105th ligne. The Swiss managed to maintain their reputation as keen fighters by losing at least half their number in this game.
Now what sort of fiendish weapon do the allies possess that could cause so many casualties to one of my Saxon battalions supposedly safe behind our lines?
Yep, you guessed it!
And here are the Poles on the right flank of the French line on the south table. We had 4 units in czapka (at the far end of the line in this shot) and very smart they looked. As you can see Poniatowski made a rare trip out from my display cabinet to take command of these brave fellows.
These are more of Augereau's men advancing in a rather determined looking fashion to try and secure the villages for the French.
This is Macdonald's corps viewed from the left of the French line. His infantry have already secured Markkleeberg in the distance while his cavalry thrunder forward to meet the Russians.
A general view along the south table at about turn 4. The Russians and Austrians are advancing as both sides try to secure the villages. In the foreground a cavalry clash seems iminent.
The splendid Splenys advance behind two other splendid Austrian units on loan for this game. The flags of these two units are wonderfully painted Clayton cast-on ones.
Russian infantry press on towards Markkleeberg. The unit in the centre rear is the only unit of Russians in my collection the remainder of the units shown here are Roy's.
The Swiss have taken Connewitz. Meanwhile the Poles seem to be making a bit of a ragged advance towards a solid wall of Austrian infantry.
This is another view of the centre of the south table from the French side. Those are my own cuirassiers and carabineers riding past in the foreground - I'm not sure where they're going.
A cavalry battle is finally underway between Macdonald's troopers and those of the Russians. This fight was to continue all day with more and more reserves being drawn into it on both sides.
On the north table Blucher seems to be sending half his heavy cavalry over to support Bernadotte on the left. These are dragoons and cuirassiers from Roy's collection.
A rather colourful cavalry melee - Saxons collide with my recently completed Prussian dragoons. As I remember the dragoons got the better of this clash. Behind the cavalry is a field of Swedes (that was a joke waiting to happen) as Bernadotte aka Roy moves to turn Marnont's flank.
Not a great moment for my cavalry as Roy charges the Brandenburg lancers into my DK combined cuirassiers/dragoons and sends them packing.
Near Markkleeberg, having gained the village, the French have stopped advancing and have formed line ready to receive the Russians with a volley.
Ah, so that's where they were going - into the fight for Connewitz.
The view from behind Macdonald's lines as his infantry deploy. In the left distance you can see the fast developing cavalry melee.
The Poles confronted by rather a lot of Austrians. I'm not quite sure what Poniatowski was up to but fortunately Schwarzenburg never did press home fully on this flank. The allies seemed intent on capturing the villages on the south table rather than attempting to take Leipzig itself.
This seems to be of much more interest to Schwarzenburg - Austrian infantry about to storm Connewitz.
The French however are not going to take this lying down - forward the 105th!
The continuing cavalry battle - the French cuirassiers to the left are part of the reserve. Napoleon chose to drip feed his reserves into the battle rather than to bring them all on in one place. This was probably a wise decision.
The Russian guns blaze away in support of their cavalry. Things are definitely hotting up!

To be continued.

Tuesday 25 October 2016

Naumarkisches Dragoons - finished

Just in the nick of time for Vintage Leipzig here are the completed 6th Naumarkisches Dragoons. The figure used is PN.81 Prussian Dragoon (mounted) charging. All the castings are reproductions figures (but nice ones) and the trumpeter is a conversion from the same figure.

I didn’t have a unit of Dragoons in my original 1970s Prussian army but always wanted one having been inspired by the illustration of a trooper of the 1st Koningin Dragoons in my Blandford Uniforms of Waterloo. I went with the Naumarkisches regiment simply because this is the uniform described in the Hinton Hunt painting instructions.

I’ve actually accumulated quite a force of Prussian cavalry now when these are added to the Cuirassiers and Uhlans. All three regiments will shortly be seeing action in Blucher’s Army of Silesia in the forthcoming Leipzig game.

Saturday 15 October 2016

All buttoned up

An unexpected burst of painting activity saw me complete my Prussian dragoons this week. I even managed to paint all the buttons in one hour which is a personal best. I think the secret may be painting five figures at one time (rather than my normal two or three with cavalry) as I was less critical of my work – I often revisit a figure unnecessarily because of some perceived minor blemish that will never be noticed on the tabletop.

I also took the time to clear up my painting desk which had been cluttered all year with too many things on the go. My new regime will be to paint only 6 infantry, 3 cavalry or a gun and crew at any one time. I’ll allow myself to have the next batch undercoated and ready but apart from that everything else will be cleared out of sight. This way I can switch between units and projects as much as I like but only after a batch has been completed.

I just need to get these figures varnished and based and then they will join the other half of the regiment to make a full 12 figure unit.

Sunday 9 October 2016

Dragoon update

Those five Prussian Dragoons are still on my painting desk and I’m gently easing them towards completion. I’ve noticed that I’m slowing down as I approach the point where I will have to add all those white buttons. However I still hope to have them ready in time for the Leipzig game.

It’s over ten years since I started this project (and nearly ten years since I started this blog) and I have to confess that I am running out of steam a bit now. A roll call reveals that I have 23 units of infantry (including my skirmish units), 11 of cavalry and 9 artillery batteries and that’s more than enough figures for one-on-one or solo games. The balance is a little off with the French being outnumbered but this can always be rectified by some unorthodox alliances.

I still have a fair few units that I want to paint including more Old Guard infantry, Brunswick infantry, Eclaireurs, and of course more Prussians but strictly speaking I don’t actually need them in order to play a decent game. It all comes down to painting time I guess!

Saturday 1 October 2016

Planning Vintage Leipzig

When Roy and I were sorting out the details of Vintage Waterloo we had the luxury of playing a test game which was very valuable particularly in terms of working out deployment. We won’t be having the same opportunity for Vintage Leipzig so I’ve been trying to give as much thought as possible to the way we should run the game.


Waterloo was a relatively easy battle to game as it was fought on a single day over a quite small area. Leipzig presents more of a challenge as it was fought over several days across a large area with vast forces. Clearly we won’t be able to accurately portray either the terrain or all the troops involved in the real battle in one day’s play so it will be necessary to scale everything down while trying to retain the flavour of the epic struggle fought out in October 1813.

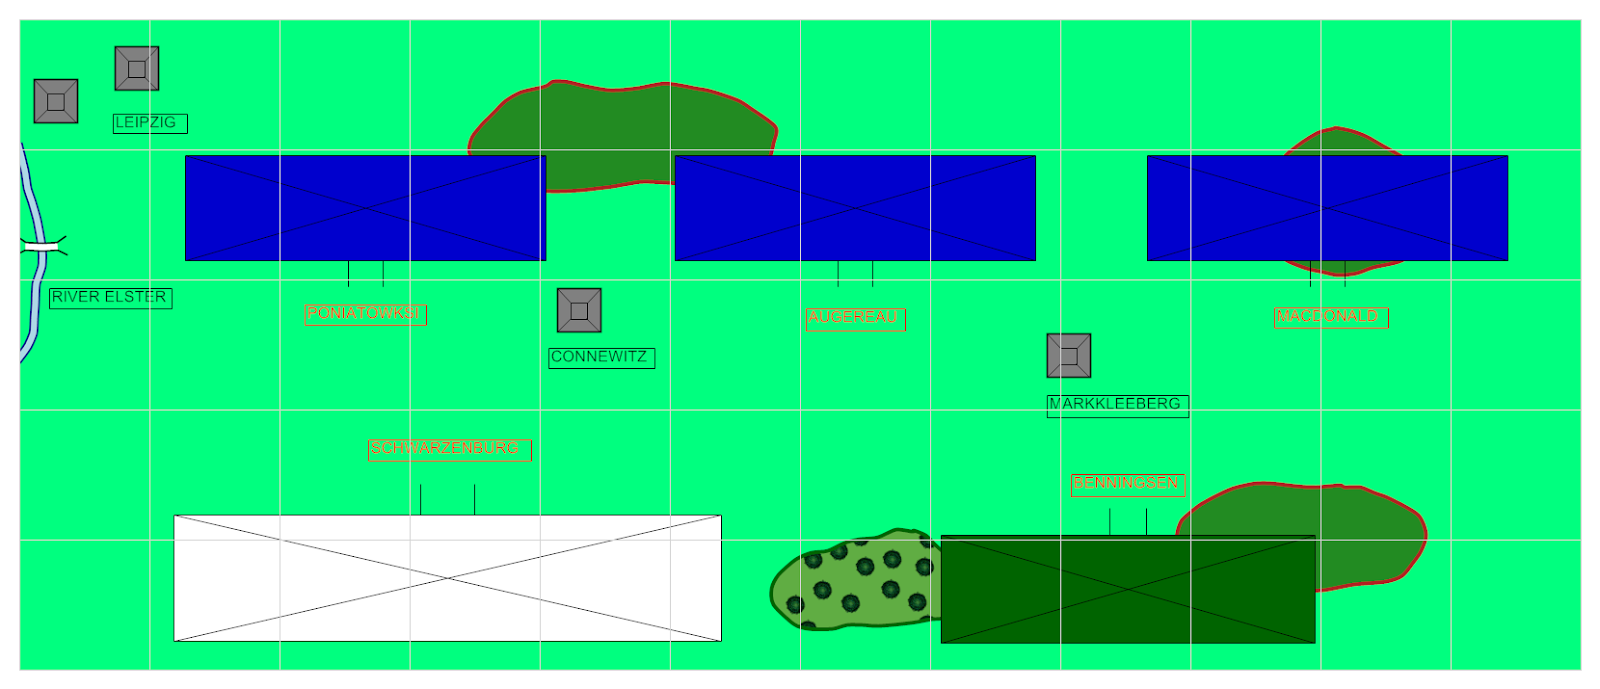
Roy has two tables in his wargame room the larger of these is 12’ x 5’ and the smaller is 8’ x 4’. The plan is to utilize both of these with the large table representing the area south of Leipzig and the smaller one the area to the north. The suburbs of Leipzig will be represented on both tables and there will be three villages spaced out along the tables to act as victory locations. The rest of the terrain will be relatively open and flat to allow space to deploy the 2,800+ figures we will be using in the game.

The southern table - 12' x 5' - showing deployment areas

Victory Conditions - at the end of play victory will be determined as follows:

French Decisive Victory – if all of Leipzig and all villages are in French hands
French Substantial Victory – if all of Leipzig and 2 villages are in French hands
French Marginal Victory – if part of Leipzig and 2 villages are in French hands
Allied Decisive Victory – if all of Leipzig and 2 villages are in allied hands
Allied Substantial Victory – if part of Leipzig and 2 villages are in allied hands
Allied Marginal Victory – if all villages are in allied hands

The northern table - 8' x 4' - showing deployment areas

The order of battle has been scaled down to provide four commands to each side giving us a total of eight players which is as many as we can comfortably accommodate. I’m hoping the game will provide some interesting challenges to both sides in particular the fight for the northern table where the allies will outnumber the French but the difference in troop quality should balance things out.

French OOB

Allied OOB

Reserves are kept off table and can be deployed at any point on the owning army’s base line from the start of turn two. Troops will not be allowed to switch between tables so deciding when and how to use reserves will require some careful thought.

One valid criticism of my rules Muskets and Marshals is that Old Guard units rated as A+ are fairly indestructible in melee (although they can be shot just as easily as lowly Landwehr). So for this game Old Guard units will be rated A and Young/Middle Guard will be rated B which can be justified by the drop in quality of units following the campaign of 1812.

In total there will be at least 95 units of infantry, 35 of cavalry and 39 artillery batteries in play in this game and whatever happens it should look quite spectacular. There will of course be copious photos posted here following the game.

Oh, and I forgot to mention there will be a RHA rocket battery…